It is an old maxim of mine that when you have
excluded the impossible,
whatever remains, however improbable, must be the truth.
Sir Arthur Conan Doyle. The Beryl Coronet.
When the bombe was set in motion the drums in the upper row of each of the three batteries rotated in precise synchrony at 120 rpm. When they had completed one revolution the middle row of drums in each battery rotated to the next position. That is, they rotated 1/26 of one revolution, and when they had rotated through one revolution the lower row of drums rotated to the next position. This continued until either the bombe detected a 'stop' or until the drums had returned to their original positions.
A stop is a setting where the transformations determined by the rotor order, rotor position, and some stecker swapping are consistent with the transformations that yielded the ciphertext from the crib. But how did the bombe detect when the consistency conditions had been met? In other words, how did it know when to stop?
A test register was connected to one of the cables, typically the cable representing the letter that appeared most frequently in the menu, so that each of the 26 wires in the cable led into and out of the test register. Each wire was in one of two states which we shall call live and dead, and the register was capable of distinguishing how many of its wires were live.
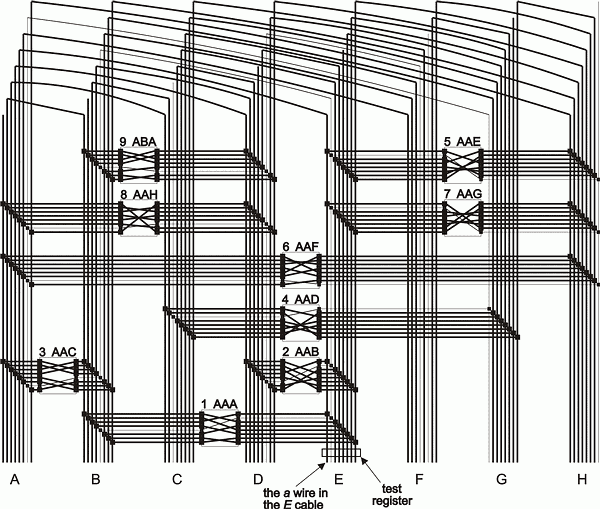
When the bombe was started it applied a voltage to an arbitrary wire in the test register's cable, say the a wire in the E cable, to represent the hypothesis that A is steckered to E and E is steckered to A. Every wire connected to the a wire in the E cable and the e wire in the A cable would immediately become live, but suppose that another wire in the E cable, for example the h wire, becomes live. This represents the hypothesis that H is steckered to E and E is steckered to H. But E cannot be steckered to both A and H so we have arrived at a contradiction and we know that this rotor order, with this rotor position and the hypothesis that A is steckered to E is false.
Do we now need to apply a voltage to the b wire in the E cable to test the hypothesis that B is steckered to E and E is steckered to B? We do not.
Having applied the current to the a wire in the E cable and therefore the e wire in the A cable and having had the current return to the h wire in the E cable and therefore the e wire in the H cable, we note that the current will pass through any scrambler connected to the A, E and H cables to wires in other cables which will not generally be the wires already energised in the A, E and H cables. Thus as the current flashes through the cryptanalytical circuitry of the bombe feeding back into cables and scramblers, more and more wires become live until, with a good menu, the feedback will almost always make all the wires in the test register live. There are two notable exceptions.
Suppose that the rotors are in the correct position but that the hypothesis being tested is false.
For example, suppose that the rotor order and position is correct and that the false hypothesis that E is steckered to A is being tested. This situation is shown in Figure 4.1 in which the thick black lines indicate those wires which are live after a voltage has been applied to the a wire in the E cable.
In this case the wires representing the true hypotheses are not connected to the wires representing the false hypotheses. But, for the reason discussed above, the wires representing the false hypotheses are connected together so when any one of them has a voltage applied to it, the voltage appears on all of them.
So, in this case, if we look in the test register we will find exactly 25 live wires and one dead wire. The dead wire, and all the wires connected to it, indicate stecker swapping consistent with the crib-ciphertext pairing.
In the example shown in Figure 4.1, the dead wires in the cables indicate that A is steckered to G, B is steckered to E, C is self-steckered, D is steckered to F, and H is self-steckered.
Now suppose that the rotors are in the correct position and that the hypothesis being tested is true.
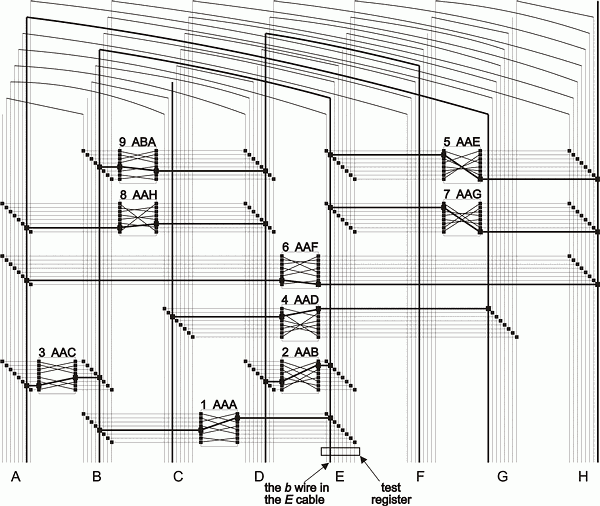
For example, suppose that the rotor order and position is correct and that the true hypothesis that E is steckered to B is being tested. This situation is shown in Figure 4.2, which has exactly the same scrambler positions as Figure 4.1 and in which the thick black lines again indicate those wires which are live, this time after a voltage has been applied to the b wire in the E cable.
In this case the wires representing the true hypotheses are not connected to the wires representing the false hypotheses so when a voltage is applied to any one of the wires representing a true hypothesis, the voltage appears on all the other wires which also represent true hypotheses, and on no other wires.
So, in this case, if we look in the test register we will find exactly 1 live wire and 25 dead wires. The live wire, and all the wires connected to it indicates stecker swapping consistent with the crib-ciphertext pairing.
In the example shown in Figure 4.2, the live wires in the cables indicate that A is steckered to G, B is steckered to E, C is self-steckered, D is steckered to F, and H is self-steckered, in other words, the steckering that the bombe has found is identical to that of Figure 4.1. The wires which are live in the test register in these two situations are the logical complement of each other.
So there are two stop conditions which the bombe looks for, either exactly one live wire or exactly 25 live wires in the test register.
In The Hut Six Story Gordon Welchman confirms that the stop condition for the bombe is that given above. However it will sometimes, but very rarely, occur that there are more than 1 but less than 25 live wires in the test register. We cannot discount the possibility that this represents a genuine stop so I think it was likely that the bombe stopped whenever there were less than 26 live wires in the test register. If the bombe stopped when there were, say, 24 live wires in the test register, a Wren could have performed a check by putting a voltage on one of the dead wires and then noting whether the other dead wire became live. If so, then we know the wires are connected and therefore cannot represent a solution, but if not then both wires represent potential solutions. Occurrences of this kind were exceedingly rare.
Note that in the example in Figure 4.1 and Figure 4.2, the E and H cables are bridged by two scramblers. Since these scramblers are in two different positions, a current input on, say, the g wire in one of them will not generally yield the same output as a current input on the g wire in the other. Sometimes however, the current input on the g wire in one of them will yield the same output as a current input on the g wire in the other, even though the two scramblers will yield different outputs from other identical inputs. This will occur, on average, in one position in 26. This situation is illustrated in Figures 4.1 and 4.2. In the other 25 out of 26 positions, the current passes through one scrambler to energise a wire in one of the two cables connected to the other scrambler and is fed back by the other scrambler through the other cable, to the former scrambler. This feedback will usually continue until all 26 wires in both the cables are live. Therefore two scramblers, when bridging the same two cables, are a very potent means of disposing of steckering hypotheses.
When the bombe detected a stop it recorded the position of the upper row of drums on one of 26 relays. The turning of the middle and lower rows of drums was inhibited and the motor allowed to slow down. The upper row of drums was then rotated into the position recorded by the relays. The bombe thus halted in the correct position and the stop position was noted by the operator and the bombe was restarted.
The stop was checked to determine whether it was correct or merely a rotor order and position that happened to be consistent with the crib and ciphertext but which was not the correct key for the Enigma.
Copyright © Graham Ellsbury 1998
Continue to Part 5. Checking the Stops
Return to The Enigma and the Bombe main page